

How Do I Outline Font In Photoshop Elements 13
Creating transparent text in Photoshop can offer a variety of great furnishings for your images, video thumbnails, or fifty-fifty watermarks. Each method I'll go over involves minimal noesis of Photoshop and requires just a couple of layers. Most of the work volition be done with the help of the Layer Way Console! Let'southward bound into how to make transparent text in Photoshop!
#i. Transparent Text Within A Shape
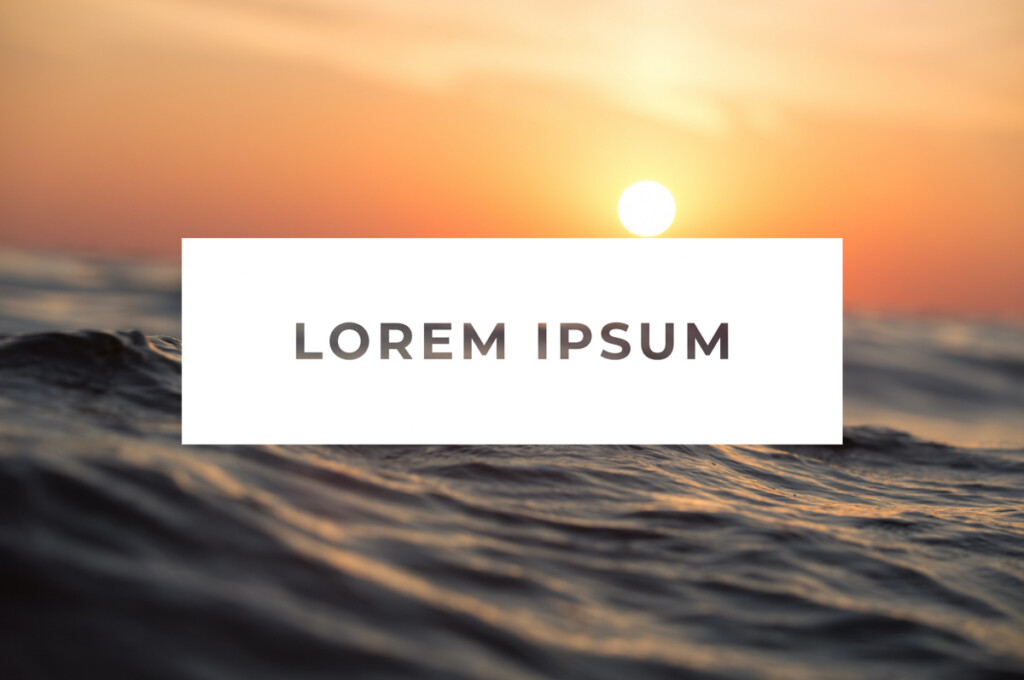
The start method is creating transparent text within a solid shape. This method only requires two layers and makes a transparent outline of the text within your shape. The effect can exist washed with whatsoever shape or with a solid color fill layer. The choice is yours! For the sake of case, I'll be putting my text onto a rectangle shape.
Here'south how to do it:
Draw your shape using the Shape Tool in Photoshop. To access the shape tool, press U on your keyboard or detect information technology in your Toolbar.
Side by side, select the shape you lot desire to depict. In this case, I'll cull the rectangle shape tool, only any choice will piece of work!
Choose your fill and stroke options for your shape. The color you choose does non affair; it's an entirely personal preference.
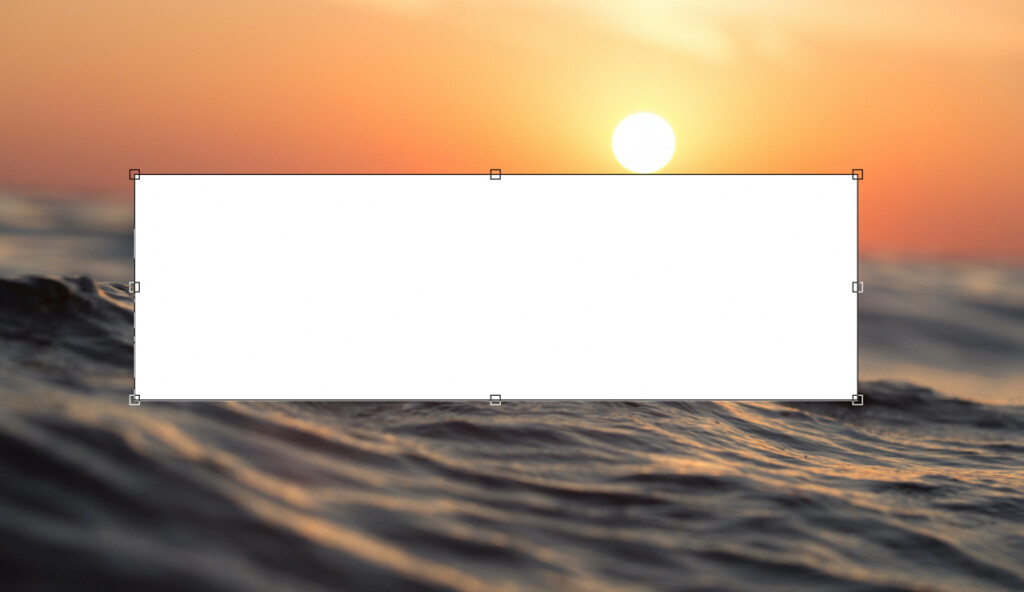
Describe your shape every bit you want information technology to announced in your image. Don't worry if it'due south non perfect; yous can adjust it later by pressing V for the Move Tool. The Move Tool will let you change the position and size of your shape.
With your shape created, grab the Text Tool by pressing T or notice it in your Toolbar. Cull a font that y'all like, bold fonts tend to look better for this effect.

Click outside of your shape to create a new text layer. Type in whatever is most fitting for your photo!

Afterwards selecting the text layer, press V to access the Motion Tool and position your text within your shape.

With your shape and text layer overlapping, double click on your text layer to open the Layer Fashion Panel.
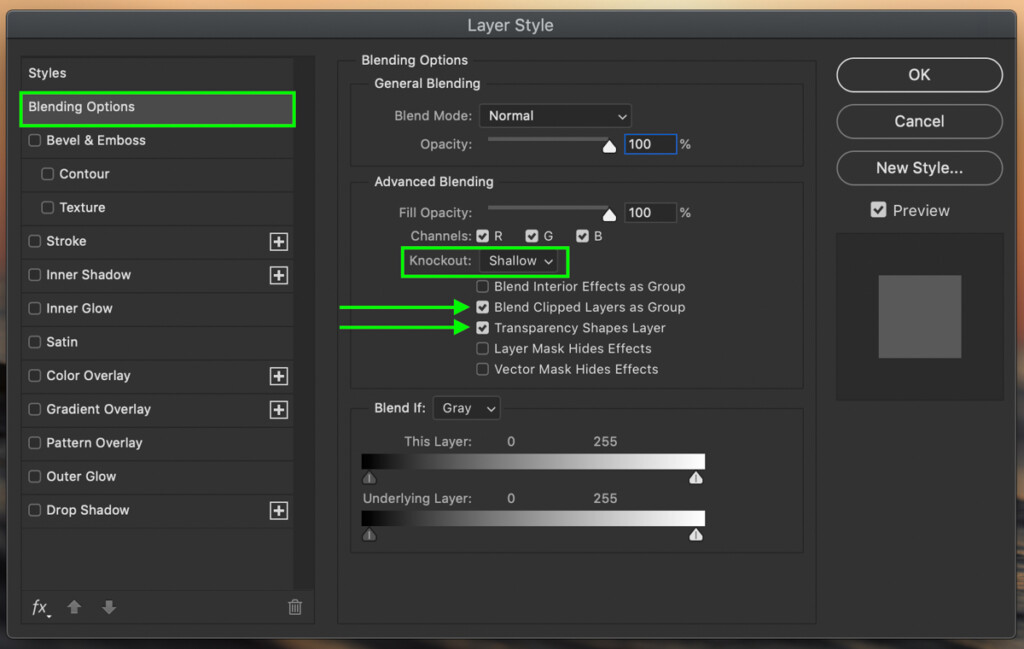
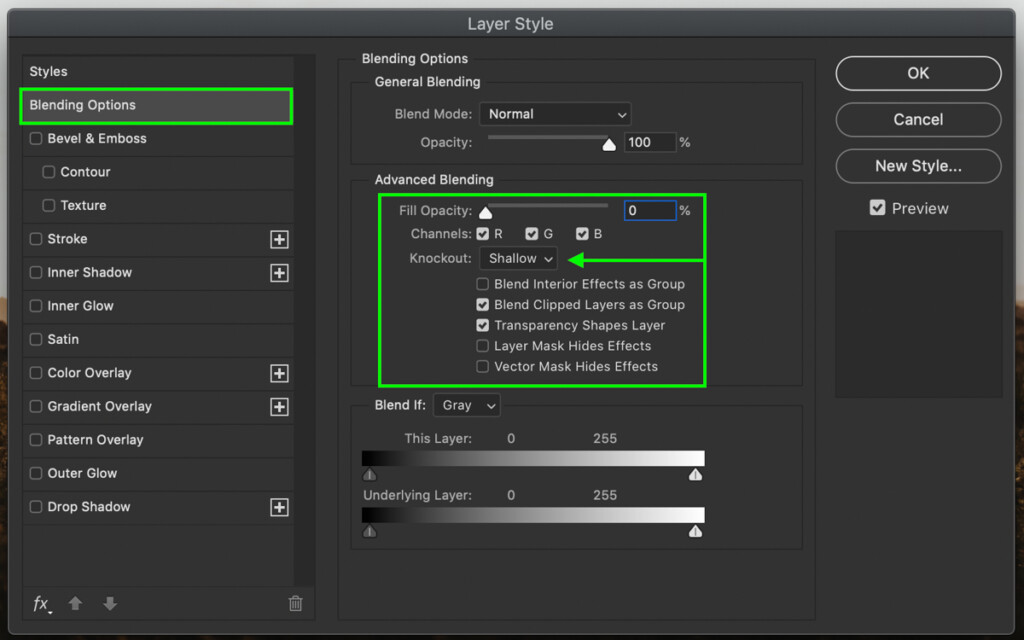
A new window will open up upward and make sure you're in 'Blending Options'.
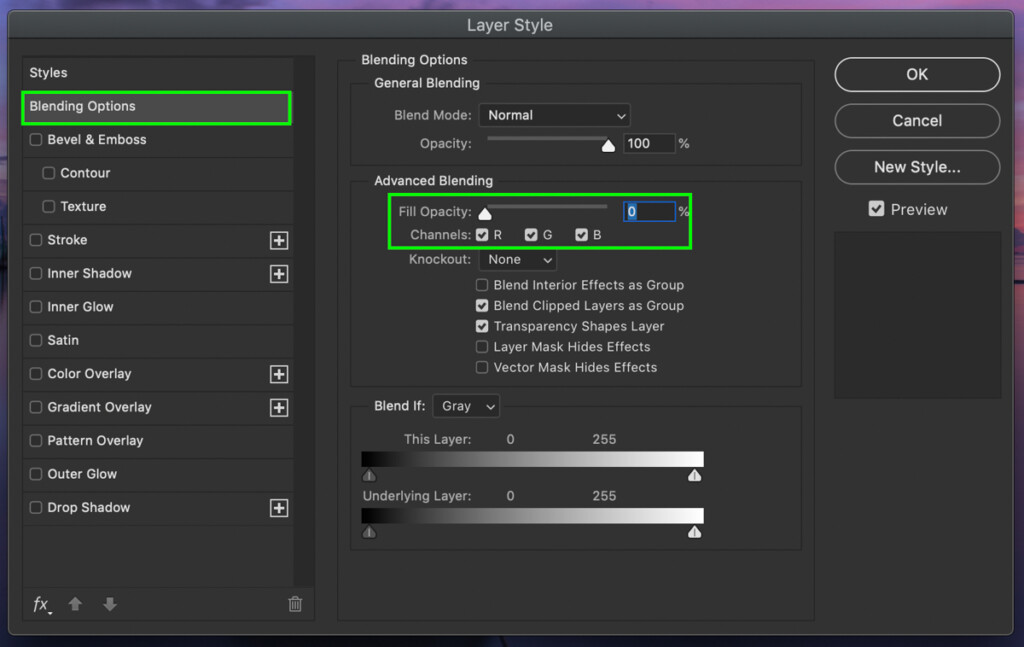
Nether 'Advanced Blending', set your Knockout to Shallow.Make certain the 'blend clipped layers as grouping' and 'transparency shapes layer' options are checked off.
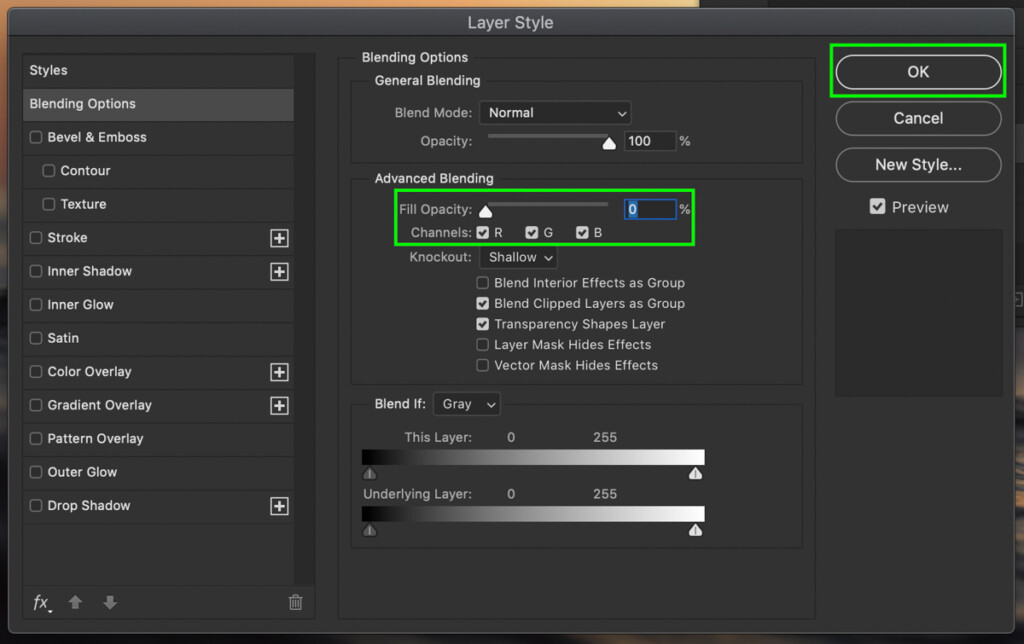
Next, set your Fill Opacity to 0%and click ok to relieve your changes.
Agree Shift and select both the text and shape layer inside your layers panel. Press Command + Yard (Mac) or Command + G (PC) to group your highlighted layers.
Rename this group to 'Transparent Text'.
– The Upshot
Simply similar that, you've successfully created transparent text in Photoshop with a few simple layer styles. You can motility the text to any position you'd like, and information technology volition always exist transparent through the underlying layer. This transparent text effect is perfect for website headers, social media thumbnails, and more than!
#ii. Transparent Stroke Text

The 2d method to make transparent text in Photoshop is with a stroke effect. A stroke is a elementary colored outline around a shape or text in your photograph. For this issue, the stroke will outline your text while the middle remains transparent.
Hither'southward how to practise it:
Grab your text tool by pressing T or find the text tool in the Toolbar.
Fix the font, size, and color of your text at the top of your screen. Click anywhere on your paradigm and type out the words you want to apply this transparent event to.

With your text typed out, double click on your text layer to open the Layer Style Panel.
In the 'Blending Options' tab nether 'Advanced Blending', bring the Fill Opacity down to 0%.
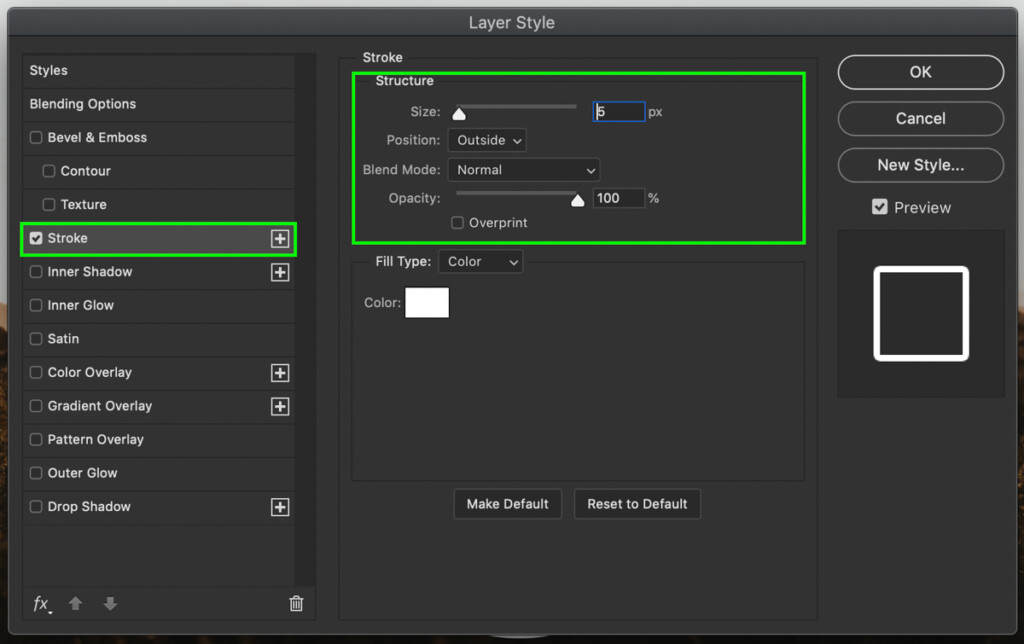
Next, select the Stroke tab.
Gear up the size of your stroke to whatever best suits your text. The amount will depend on the size and font y'all are using.
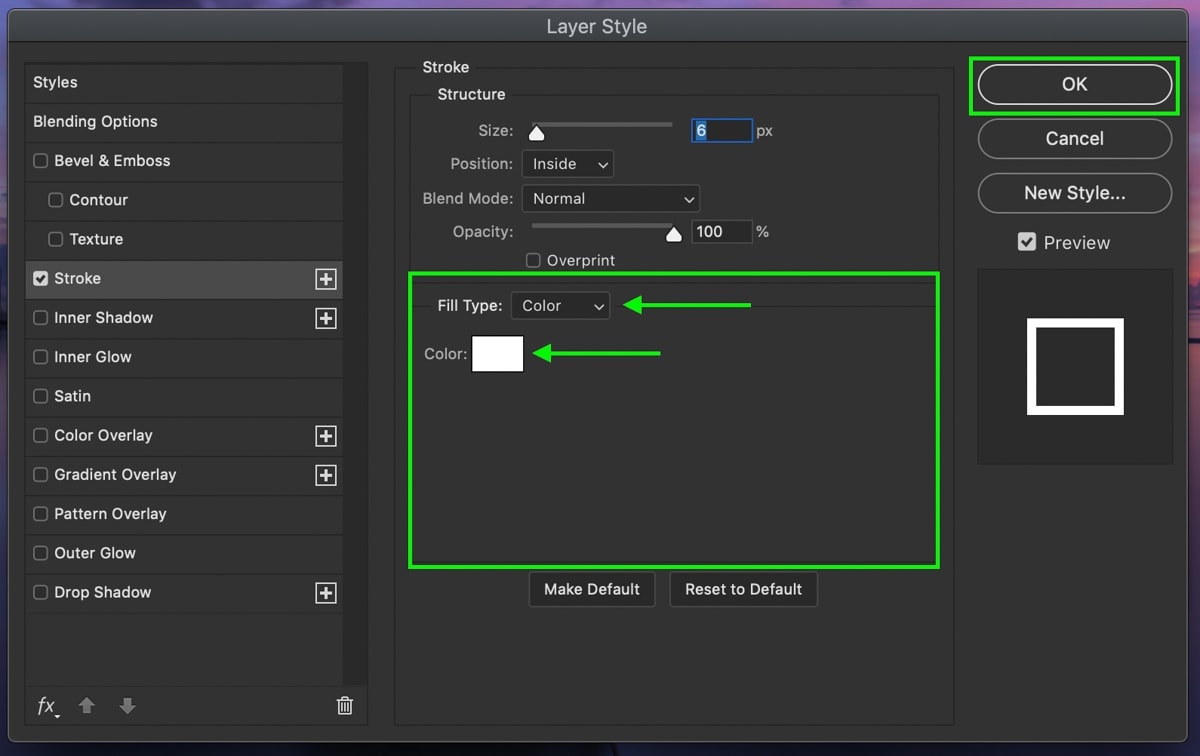
Set the Position to 'Within, Alloy Mode to 'Normal' and opacity to 100%.

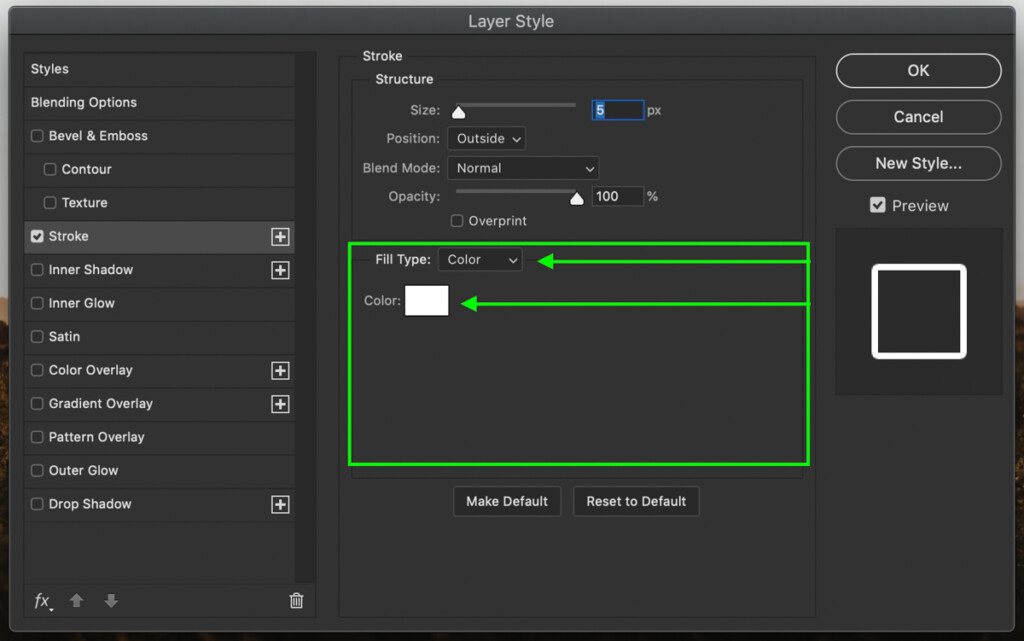
Make certain the Make full Type is fix to 'color' and cull any colour y'all'd like for your stroke.
Once you're happy with the stroke adjustments, click ok to salvage your changes.
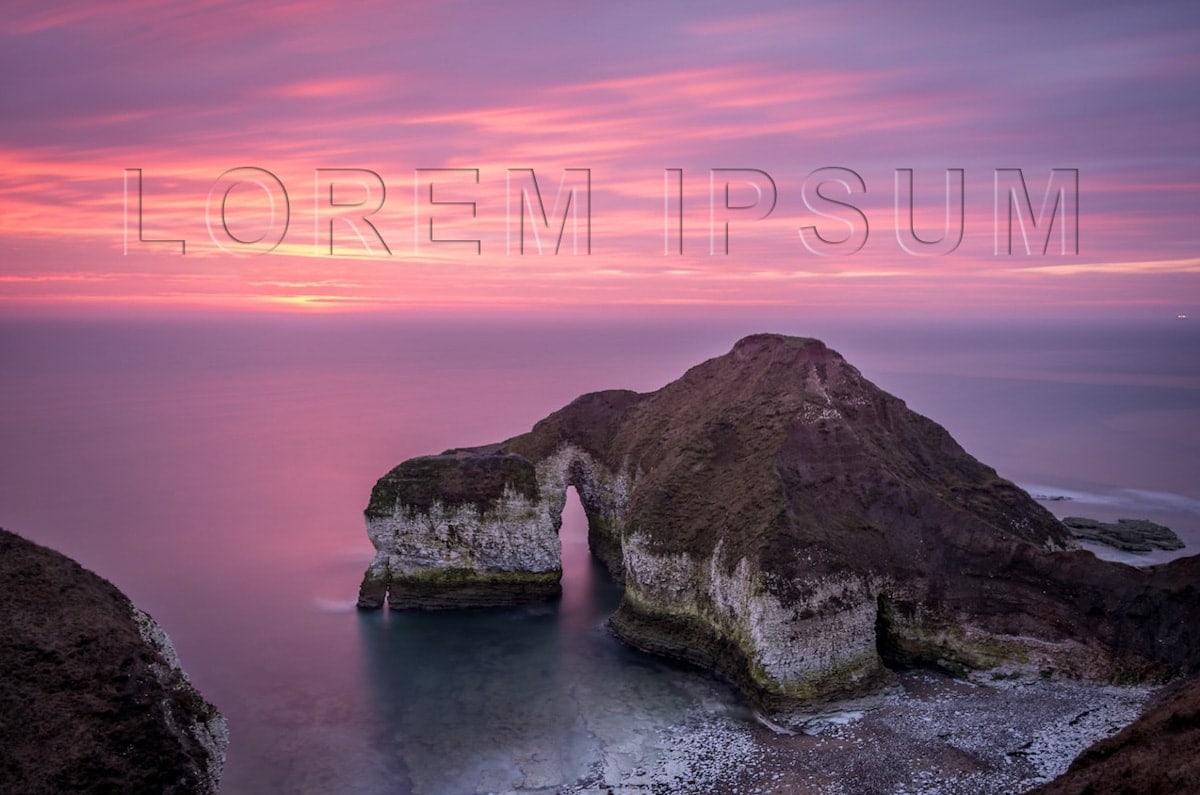
– The Result

This is another uncomplicated mode to make transparent text in Photoshop, this time using a stroke. Since the text is invisible, adding a stroke just creates a shape around the text outline. That way, all you're left with is a colored outline with a transparent center!
#3. Transparent Bevel Text Effect
The 3rd way you can brand transparent text in Photoshop is by using your bevel and emboss settings. The result gives you a transparent bevel text that's faintly visible in your paradigm. This text outcome is fantastic if you want to be more subtle with your text or fifty-fifty create a custom watermark in your photo!
Here'south how to do it:
Grab your text tool by pressing T or click on the Text Tool in your Toolbar.
Set the font, size, and colour of your text at the peak of your screen. Click anywhere on your paradigm and type the text you desire.

With your text written out, double click on your text layer to open the Layer Style Console.
Nether the 'Blending Options' tab, bring the Fill Opacity down to 0%. This will brand your text completely invisible.
Click on the Bevel and Emboss tab in your layer styles panel.
Ready the Style to 'Inner Bevel', Technique to 'Smooth', and Direction to 'Up'.
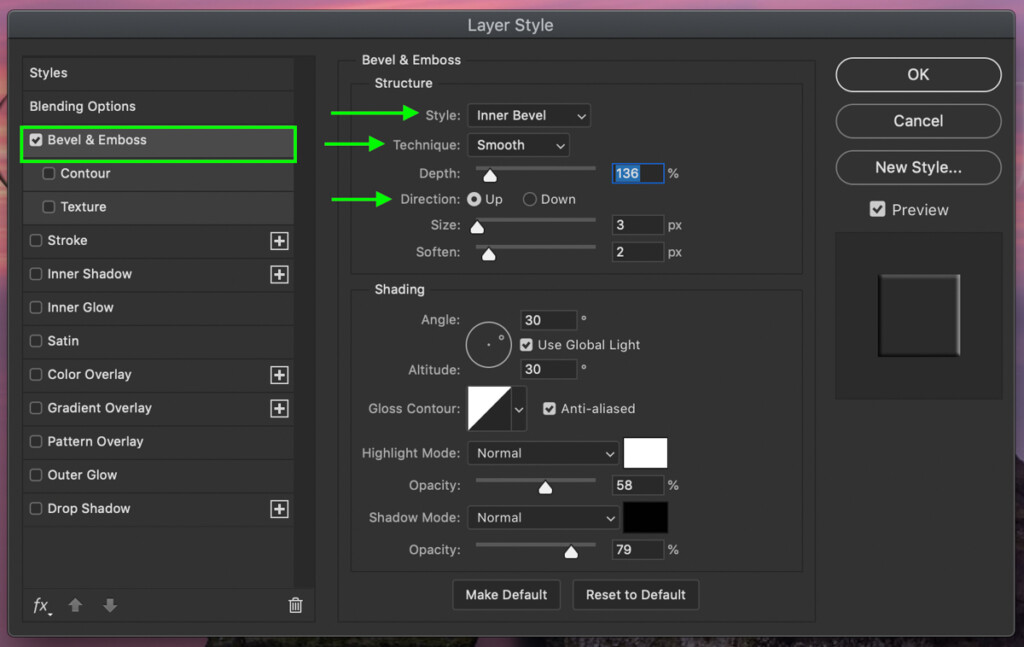
Set the Depth to anywhere betwixt 1% and grand%. For the best effect, I would suggest between 85% – 250%.
Choose a size between 1px – 25px depending on how obvious you lot desire the transparent text to look.
Get out the soften setting prepare betwixt 1px – 10px.

At present you will add a flake of basic shading to help sell the event. Check off 'Utilise Global Lite' and set your angle by clicking within the angle circle. This will set what direction the shading is practical from.
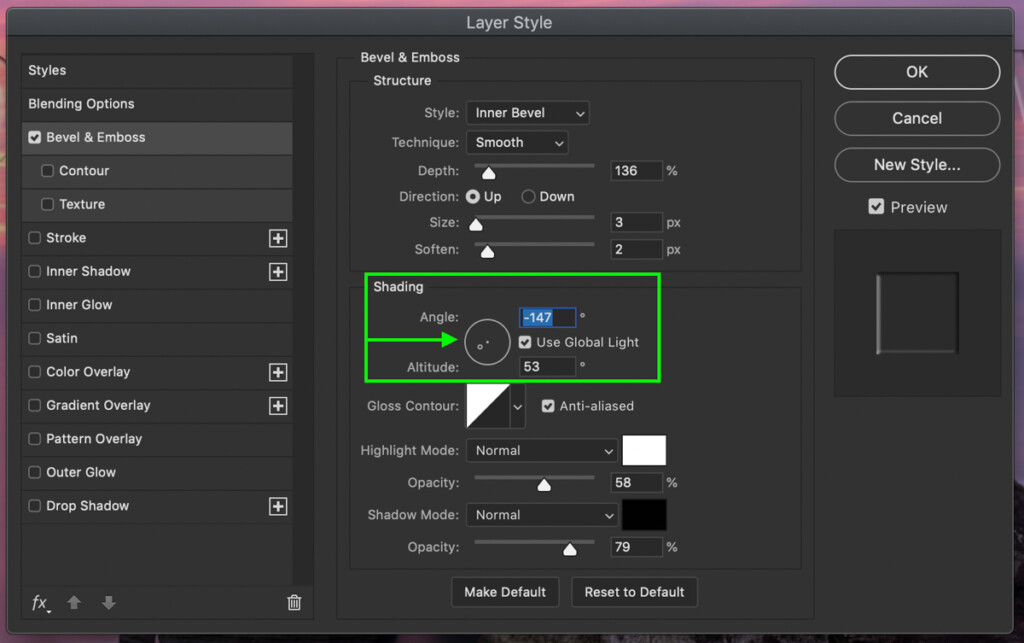
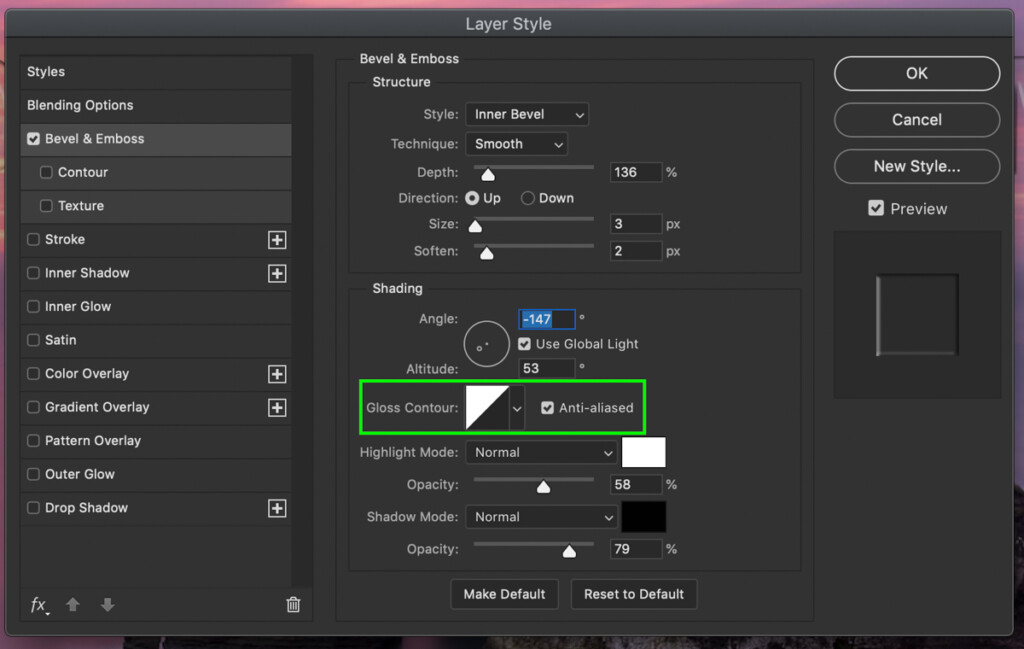
Set your Gloss Contour to the aforementioned as shown beneath and cheque off 'Anti-aliased'.
Set your Highlight Mode to 'Normal' and choose a white colour. Option an opacity betwixt 30% – 50%.
Brand sure your Shadow Manner is set to 'Normal' and choose a blackness color. Set your opacity between 40% – 70%.

Click ok to save your changes and exit the Layer Style Panel.
– The Upshot

This method lets you make transparent text in Photoshop by using shadows and highlights to bevel your text. That way, your text takes on the advent of transparent 3D text that'southward only visible with black and white around the edges!
#four. Knockout Stroke Text Effect

To take things a little farther, you tin can combine the first ii transparent text furnishings we discussed into one. This creates a unique and highly stylized look that you tin utilise in a variety of designs. For this transparent text effect, you will combine the knockout text with an added stroke. One time you resize the text to be slightly larger than the shape, it looks like the solid color transitions into the text.
Here's how to do information technology:
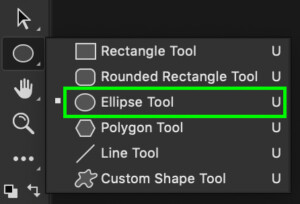
Catch your shape tool by pressingU or click and hold over the shape tool icon. Choose any shape you want to utilise as your background shape. For this example, I will utilise a circle.
Set the color and stroke values for your shape. This outcome will work best if yous take a transparent shape stroke represented by the white box with a red line.

Click anywhere on your screen to draw out your shape.
With your shape made, grab your text tool by pressing T or find information technology in the Toolbar. Choice your font and size settings just don't get too hung up on it because you lot tin always alter this later on. Click anywhere exterior your shape to create a new set of text.
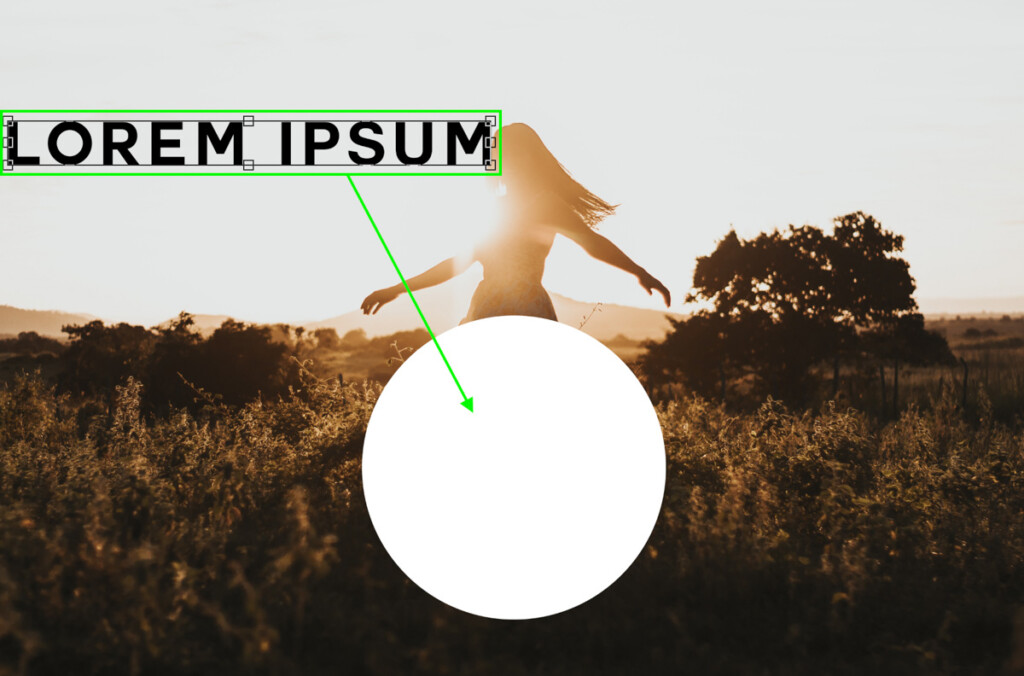
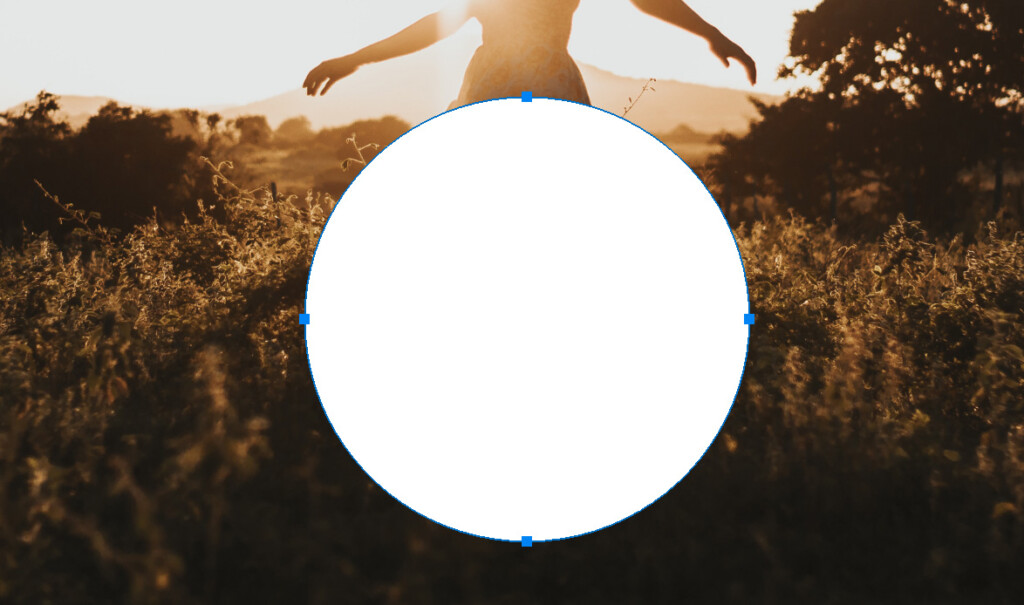
In one case your text is written, grab your motion tool by pressing V and reposition it to fit over your shape. Rescale your text so it is overflowing from the shape every bit shown below.

Double click on your text layer to open up the Layer Style Panel.
Under 'Blending Options' ready your fill opacity to 0% and set the Knockout to 'Shallow'.
Side by side, click on the stroke tab to add together a stroke to your text. Ready your size to something like 5px, position to 'outside', blend mode to 'normal', and opacity to 100%.
Brand certain your fill up type is set up to 'colour' and cull a stroke color to lucifer your shape. In this instance that will be white.
Click ok to salve your changes.
Shift-click your shape and text layers then printing Control + G (Mac) or Control + 1000 (PC) to grouping the layers. Rename this group to 'Knockout Stroke Text'.
– The Upshot
That'due south how you create another bang-up transparent text result in Photoshop merging together ii of the techniques discussed earlier. This issue is perfect if you want to further stylize your text!
Conclusion
And so that was 4 slap-up ways you can make transparent text in Photoshop in a variety of styles. With these options, you'll be able to apply the perfect transparent text issue for your photo. Yous tin can get creative and merge different versions of these transparent text furnishings to get even more multifariousness.
Want more than articles like this one? Subscribe to my weekly newsletter for more photography, and photograph editing tutorials delivered straight to your inbox!
Source: https://www.bwillcreative.com/how-to-make-transparent-text-in-photoshop/
Posted by: owencamir1998.blogspot.com
0 Response to "How Do I Outline Font In Photoshop Elements 13"
Post a Comment